How to Run JMeter Script Using Ant

How to Run JMeter Script Using Ant,Apache Ant is a pure Java build tool which is useful in compile,clean and test and run Java applications.Apache JMeter providing option to run JMeter Test Plan using Ant and displays BUILD is successful or Failure and Ant BUILD generates HTML reports after completion of execution of ant.

How to run jmeter script using ant


Also Read


How to Run JMeter Script Using Ant

In this post you will learn How to Run JMeter Script Using Ant,Apache JMeter providing Ant xml file in this path F:\apache-jmeter-3.1\extras, and build.xml file have below details.

<project name="ant-jmeter" default="all">
<description>
Jmeter Ant build description Default Value is "Load Test Results"
</description>
<property name="testpath" value="${user.dir}"/>
<property name="jmeter.home" value="${basedir}/.."/>
<property name="report.title" value="Load Test Results"/>

Function Mode:

<echo>funcMode = ${funcMode}</echo>
<delete file="${testpath}/${test}.html"/>
<jmeter
jmeterhome="${jmeter.home}"
testplan ="${testpath}/${test}.jmx"
resultlog="${testpath}/${test}.jtl">

XSLT Report:

<target name="xslt-report" depends="_message_xalan">
<tstamp><format property="report.datestamp" pattern="yyyy/MM/dd HH:mm"/></tstamp>
<xslt
classpathref="xslt.classpath"
force="true"
in="${testpath}/${test}.jtl"
out="${testpath}/${test}.html"
style="${basedir}/jmeter-results-detail-report${style_version}.xsl">
<param name="showData" expression="${show-data}"/>
<param name="titleReport" expression="${report.title}"/>
<param name="dateReport" expression="${report.datestamp}"/>
</xslt>
</target>

Condition:

<!-- Check that the xalan libraries are present -->
<condition property="xalan.present">
<and>
<!-- No need to check all jars; just check a few -->
<available classpathref="xslt.classpath" classname="org.apache.xalan.processor.TransformerFactoryImpl"/>
<available classpathref="xslt.classpath" classname="org.apache.xml.serializer.ExtendedContentHandler"/>
</and>
</condition>
<target name="_message_xalan" unless="xalan.present">
<echo>Cannot find all xalan and/or serialiser jars</echo>
<echo>The XSLT formatting may not work correctly.</echo>
<echo>Check you have xalan and serializer jars in ${lib.dir}</echo>
</target>


As you see in above build.xml file i have given three parameters xml values because you need to change those three values as below,please follow below steps to configure.

Build.xml file Configuration:


1.Open build.xml file with notepad or notepad++ and search with " ${test} " and rename with your jmx file name as below.

${test}.jmx - softwaretesting.jmx
${test}.html - softwaretesting.html
${test}.jtl - softwaretesting.jtl

In Function Mode , XSLT report parameter values as below.

Function Mode:

<target name="run">
<echo>funcMode = ${funcMode}</echo>
<delete file="${testpath}/SoftwareTestingdemo.html"/>
<jmeter
jmeterhome="${jmeter.home}"
testplan ="${testpath}/SoftwareTestingdemo.jmx"
resultlog="${testpath}/SoftwareTestingdemo.jtl">

XSLT Report:

<target name="xslt-report" depends="_message_xalan">
<tstamp><format property="report.datestamp" pattern="yyyy/MM/dd HH:mm"/></tstamp>
<xslt
classpathref="xslt.classpath"
force="true"
in="${testpath}/SoftwareTestingdemo.jtl"
out="${testpath}/SoftwareTestingdemo.html"
style="${basedir}/jmeter-results-detail-report${style_version}.xsl">
<param name="showData" expression="${show-data}"/>
<param name="titleReport" expression="${report.title}"/>
<param name="dateReport" expression="${report.datestamp}"/>
</xslt>
</target>

2.Save the build.xml file.
3.Now Copy softwaretesting.jmx file in F:\apache-jmeter-3.1\extras folder as below.
4.Now open Command Prompt.
5.Go to F:\apache-jmeter-3.1\extras folder path
6.Enter ant and press enter,once BUILD is successful then it will display below details in command prompt.
How to run jmeter script using ant

7.Now go to F:\apache-jmeter-3.1\extras folder ,it will generate softwaretesting.jtl,softwaretesting.html files.
Run jmeter script using ant

8.Now open Softwaretesting.html file ,below reports will display all samples related HTML reports.

Load Test Results:


Thank you for reading My post please provide your valuable comments,in case you are facing any problem while generating the reports.

How to open Jmeter jtl file in Excel example

How to open Jmeter jtl file in Excel example gives you knowledge about open jmeter Test results jtl file in Excel workbook with real time example.Please follow below steps to open Jmeter jtl file in Excel.Using Jmeter you can save Test result file in csv,xls,txt and jtl formats and with the help of Simple Data Writer Listener as provided specific path in local system.

How to open Jmeter jtl file in Excel example


How to open Jmeter jtl file in Excel example


In order to perform above task we require below details,those are

1. Jmeter Test Plan.
2.Some HTTP/SOAP/REST service Samples.
3. Listener - Simple Data Writer.
4.Write results to file Path .
5.Set Up Thread group for Number of virtual users to run.
6.In case you are using apache-jmeter-3.0 new version then you need to copy paste below xsl files from old version and my old apache jmeter version is "apache-jmeter-2.13".
Go to apache-jmeter-2.13/extras folder then you will find below XSL format files,those are
  1. jmeter-results-detail-report.xsl
  2. jmeter-results-detail-report_21.xsl
  3. jmeter-results-report.xsl
  4. jmeter-results-report_21.xsl
Jmeter jtl file from Excel

7.Just copy paste above old version files in new version that is apache-jmeter-3.0/extras,it will looks like below.Let's see below example to generate jmeter results file in jtl format which is save in xml format with .jtl extension and adding some simple path in xml file,then only jtl file will open in Excel workbook.

Also Read:

  1. Generate HTML Report Dashboard.
  2. Jmeter SOAP/REST Web Services Testing
  3. Response Assertion Examples.
  4. XPATH Assertion Examples.
  5. Transaction Controller Examples.

Configurations in Simple Data Writer:


Before running your Test plan in Jmeter,you need to configure Sample Result Save Configuration in Simple Data Writer window panel,Please follow below steps.

STEP 1 : Add Simple Data writer from Right click on Thread Group - Add - Listener - Simple Data Writer
STEP 2 : Click on Configure button.
STEP 3 : Select require check boxes to save in results file.

Jtl file from Excel example


VIDEO TUTORIAL:


Note : In case Save as XML checkbox is not selected in Sample Result Save Configuration dialog box then your jtl result file save in csv format but we require to save it in XML format.

STEP 4 : Select Save as XML check box in Sample Result Save Configuration dialog box.
STEP 5 : Now enter Write results to file/Read from File path with file name as E:\QTP_Tutorials\JMETER\TestResults\Test-results.jtl

Note : You should not create jtl extension file manually because Simple Data Writer automatically creates given file name with .jtl extension.

STEP 6 : Now Run your Test Plan
STEP 7 : Now open Specified File name results path and you will see Test-results.jtl file is generated as below.

JTL Test Result File

STEP 8 : Now open .jtl file in Notepad or Wordpad or Notepad++ ,it will open as below.

STEP 9 : Now copy below path in between <?xml version="1.0" encoding="UTF-8"?> and <testResults version="1.2">

Code : <?xml-stylesheet type="text/xsl" href="F:\Java_Applications\apache-jmeter-3.0\extras\jmeter-results-detail-report_21.xsl"?>

STEP 10 : Save your .jtl file and close the same.
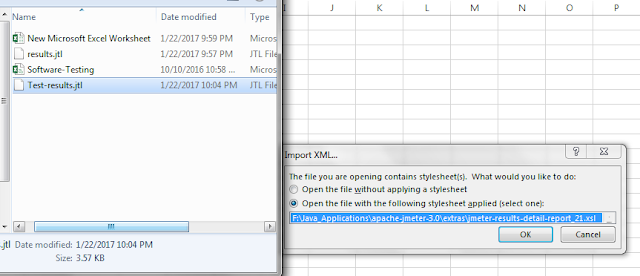
STEP 11 : Open empty Excel workbook and drag and drop .jtl test results file into Excel workbook,select "Open the file with the following style sheet applied(Select One)"


How to Open jtl file from Excel examples


STEP 12 : Click on OK button.
STEP 13 : Again click on Yes button.
STEP 14 : Now your Test Results reports will generate in Excel workbook as below.

Test Result:


You will see below Load Test Results.

Jmeter jtl file from Excel workbook

JTL Load Test Results in EXCEL Workbook


Please provide your valuable comments on this post How to open Jmeter jtl file in Excel example.Thank you for reading.

Jmeter SOAP/REST Web Services Testing

Jmeter SOAP/REST Web Services Testing plan creation,in this lesson you will learn web services testing using Jmeter performance testing.Web Services is a client server application component using for communication between multiple systems or applications. Web Services transferring the data between different system with the help of Protocols example http protocols.In order to understand here i am using simple flight web services URL to create web services test plan in Jmeter. Let's create Web Services Test plan in jmeter.

Jmeter SOAP/REST Web Services Testing

Before creating web services test plan in jmeter we should require following details.

1.Web Service URL.
2.Web Service input parameters
3.Web Service Response details

Must Read

Generate Jmeter Report Dashboard
Xpath Assertion in Jmeter
Apache Jmeter Web Test Plan


Steps to Create Web Services Test Plan

1.Open Apache Jmeter from F:\apache-jmeter-3.0\bin folder by double click on jmeter.bat file in windows.
2.Right click on Test Plan Add - Threads - Thread Group,Enter following details

  • Number of Threads(Users):
  • Ramp up Period(in Seconds)
  • Loop Count
Jmeter Web Services Testing
Thread Group


3.Right click on Thread Group - Add - Sampler - SOAP/XML-RPC Request,it will display below details

Jmeter Web Services Testing


  • URL : Web Service url ex : http://localhost:24240/HPFlights_SOAP
  • Send SOAP Action
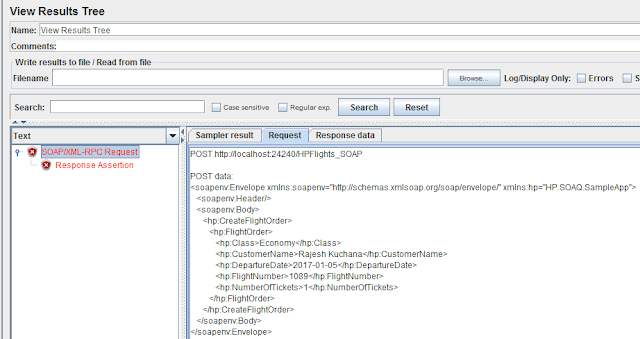
  • Soap/XML - RPC Data : This text area useful in writing SOAP input parameters in SOAP request as below.
Jmeter SOAP Testing


4.Now add Response Assertion to verify the web services response,Right click on SOAP/XML-RPC Request - Add - Assertions - Response Assertion.

Web Services testing using Jmeter

5.Click on Add in Pattern to Test and enter pattern to verify from Web Service Response as below.

Web Services Response Testing
Response Assertion - Pattern to Test


6.Add View Result Tree from Listeners, Right click on Thread Group - Add - Listeners - View Result Tree.
Apache Jmeter Web Services Testing


7.Save your script.
8.Now run your script and verify View Result Tree window whether it is pass or fail.

View Result Tree - PASS

Apache Jmeter Web Services Testing


View Result Tree - FAIL

Apache Jmeter Soap/Rest web services testing


What have you learn?

1.What is web services?
2.How to create web services test plan
3.How to add web services in jmeter
4.How to verify the web services response with assertions.